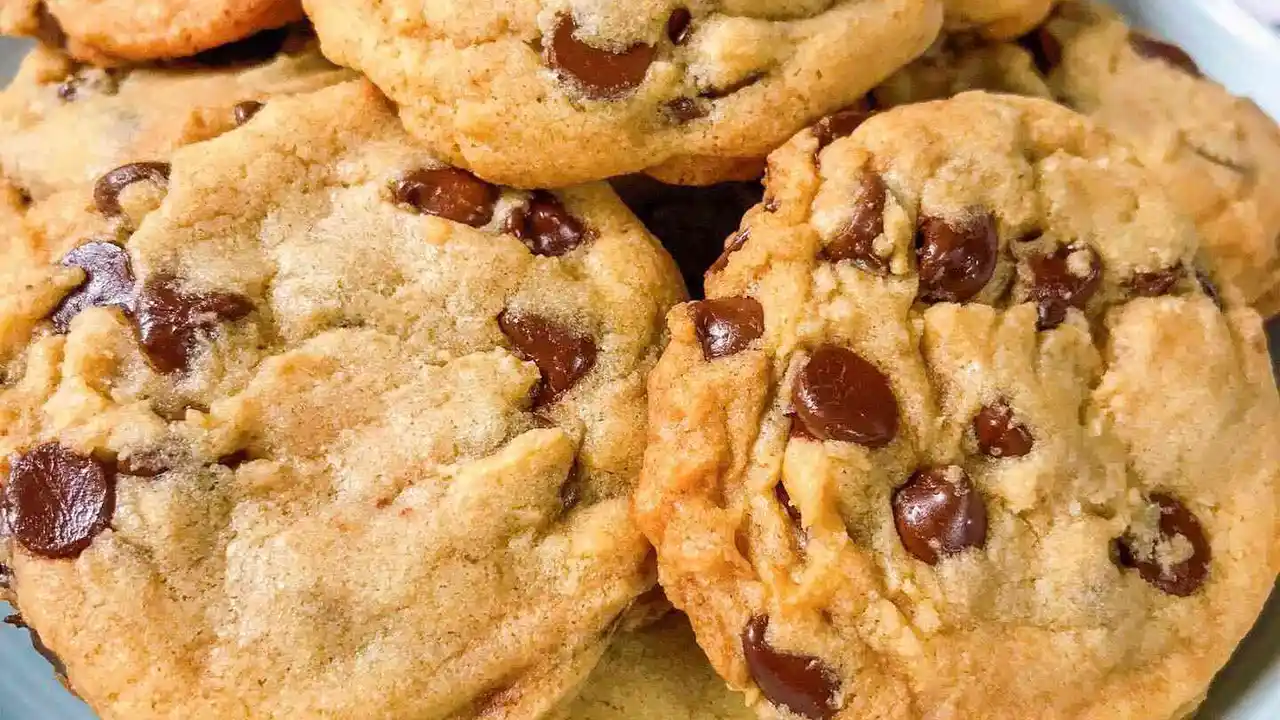
7 Best Chocolate Chip Cookie Recipes Chewy and Gooey

Indulge in the ultimate classic dessert with these 7 irresistible chocolate chip cookie recipes! From perfectly chewy centers to gooey chocolate chunks, we've got a cookie for every craving. Whether you're a seasoned baker or a beginner, you'll find a recipe that will become your new go-to. Get ready to fill your kitchen with the warm, comforting aroma of freshly baked chocolate chip cookies!
Discover the secrets to achieving cookie perfection, from choosing the right ingredients to mastering baking techniques. We'll guide you through each step, ensuring your cookies turn out flawlessly every time. Get ready to impress your friends and family with your amazing baking skills!
The Ultimate Guide to Chewy Chocolate Chip Cookies Baking Tips and Tricks
So, you want chewy cookies? Let's dive into the secrets. The key to achieving that desirable chewiness lies in a few crucial elements. First, consider your ingredients. Brown sugar, with its molasses content, is your best friend here. The molasses adds moisture and helps create a softer, chewier texture. Using more brown sugar than granulated sugar will significantly enhance the chewiness of your cookies.
Next, think about the fat you're using. Melted butter, rather than softened butter, can also contribute to a chewier cookie. The melted butter creates a flatter cookie that is crispier around the edges and chewier in the center. Experiment with different ratios of melted to softened butter to find your perfect balance.
Another important factor is the dough chilling time. Chilling the dough allows the gluten to relax, resulting in a more tender and chewy cookie. It also helps prevent the cookies from spreading too thin during baking. Aim for at least 30 minutes of chilling time, but longer is often better. Overnight chilling can work wonders!
Finally, don't overbake your cookies! Overbaking will dry them out and make them crispy instead of chewy. Look for cookies that are golden brown around the edges but still slightly soft in the center. They will continue to set up as they cool.
Comparing Chocolate Chips Types and Brands for the Best Flavor
The type of chocolate chips you use can dramatically impact the flavor of your cookies. Milk chocolate chips will give you a sweeter, more traditional chocolate chip cookie flavor. Semi-sweet chocolate chips offer a balance of sweetness and bitterness, while dark chocolate chips provide a richer, more intense chocolate flavor. Experiment with different types of chocolate chips to find your personal preference.
Beyond the type of chocolate, consider the quality of the chocolate chips. Higher-quality chocolate chips will have a smoother texture and a more complex flavor. Look for chocolate chips that contain a high percentage of cocoa butter. Some popular brands include:
- Ghirardelli: Known for their rich, high-quality chocolate, Ghirardelli chocolate chips are a great choice for a more decadent cookie. Their semi-sweet chips are a classic option.
- Nestle Toll House: A classic and widely available option, Nestle Toll House chocolate chips are a reliable choice for everyday baking. They offer a variety of options, including milk chocolate, semi-sweet, and dark chocolate.
- Guittard: Guittard chocolate chips are known for their intense flavor and smooth texture. Their chocolate chips are a favorite among professional bakers.
- Enjoy Life: For those with dietary restrictions, Enjoy Life offers dairy-free and allergy-friendly chocolate chips that still deliver great flavor.
Consider using chocolate chunks instead of chips for a more rustic and decadent cookie. Chocolate chunks provide larger pools of melted chocolate, creating a richer and more satisfying experience. You can also chop up your favorite chocolate bar into chunks for a truly customized cookie.
Ingredient Spotlight Brown Sugar vs Granulated Sugar in Cookie Recipes
We touched on it earlier, but let's REALLY talk about sugar. The ratio of brown sugar to granulated sugar has a significant impact on the texture and flavor of your cookies. Brown sugar, with its molasses content, adds moisture, chewiness, and a subtle caramel flavor. Granulated sugar, on the other hand, contributes to crispness and a lighter color.
Using more brown sugar than granulated sugar will result in a chewier, moister, and more flavorful cookie. It will also give your cookies a slightly darker color. Conversely, using more granulated sugar will result in a crispier, drier, and lighter-colored cookie.
Experiment with different ratios of brown sugar to granulated sugar to find your perfect balance. For a super chewy cookie, try using all brown sugar. For a crispier cookie, try using all granulated sugar. And for a classic chocolate chip cookie, a 1:1 ratio of brown sugar to granulated sugar is a good starting point.
Essential Baking Tools for Perfect Chocolate Chip Cookies Every Time
Having the right tools can make all the difference in your baking success. Here are some essential baking tools for making perfect chocolate chip cookies:
- Baking Sheets: Use light-colored baking sheets for even baking. Dark-colored baking sheets can cause the bottoms of your cookies to burn. I personally love the Nordic Ware baking sheets – they're durable and distribute heat really well. You can snag a two-pack for around $30 on Amazon.
- Parchment Paper or Silicone Baking Mats: Line your baking sheets with parchment paper or silicone baking mats to prevent sticking and make cleanup a breeze. Silicone mats like Silpat are reusable and can withstand high temperatures – a worthwhile investment at around $20 per mat.
- Mixing Bowls: Use a set of sturdy mixing bowls for combining your ingredients. Glass or stainless steel bowls are ideal. A good set of Pyrex mixing bowls (usually around $30 for a set of three) will last you for years.
- Electric Mixer: An electric mixer, either stand mixer or hand mixer, will make creaming the butter and sugar much easier. KitchenAid stand mixers are a classic for a reason, but they're an investment (starting around $350). A good hand mixer from brands like Cuisinart can do the trick for around $50.
- Cookie Scoop: A cookie scoop will ensure that your cookies are all the same size and bake evenly. OXO Good Grips cookie scoops are a popular choice and come in different sizes (around $15).
- Wire Rack: A wire rack is essential for cooling your cookies. It allows air to circulate around the cookies, preventing them from becoming soggy. You can find a decent wire rack for under $10 at most kitchen supply stores.
Recipe Variations Adding Nuts, Oats, or Other Fun Ingredients
Once you've mastered the classic chocolate chip cookie recipe, it's time to get creative and experiment with different variations! Here are some ideas to get you started:
- Nuts: Add chopped walnuts, pecans, or macadamia nuts for a crunchy texture and nutty flavor. About ½ to 1 cup of chopped nuts is a good starting point.
- Oats: Add rolled oats for a chewier texture and a heartier flavor. About ½ to 1 cup of rolled oats is a good addition.
- Pretzels: Add crushed pretzels for a salty and crunchy contrast to the sweetness of the chocolate. About ½ to 1 cup of crushed pretzels is a good addition.
- Dried Fruit: Add dried cranberries, raisins, or cherries for a chewy texture and a burst of fruity flavor. About ½ to 1 cup of dried fruit is a good addition.
- Spices: Add a pinch of cinnamon, nutmeg, or cardamom for a warm and cozy flavor. About ¼ to ½ teaspoon of spice is a good starting point.
- Espresso Powder: Add a teaspoon of espresso powder to enhance the chocolate flavor and add a subtle coffee kick.
- Sea Salt: Sprinkle a pinch of sea salt on top of the cookies before baking for a salty-sweet flavor combination.
Chocolate Chip Cookie Dough Storage Tips Freezing and Refrigeration
Want to bake cookies on demand? You can easily store chocolate chip cookie dough in the refrigerator or freezer. For refrigerator storage, wrap the dough tightly in plastic wrap and store it for up to 3 days. For freezer storage, scoop the dough into individual balls and freeze them on a baking sheet lined with parchment paper. Once frozen, transfer the dough balls to a freezer bag and store them for up to 3 months.
When you're ready to bake, simply thaw the dough in the refrigerator overnight or bake the frozen dough balls directly from the freezer, adding a few extra minutes to the baking time. Storing cookie dough is a great way to have fresh, warm cookies whenever you want them!
:max_bytes(150000):strip_icc()/277019-baked-pork-chops-with-cream-of-mushroom-soup-DDMFS-beauty-4x3-BG-7505-5762b731cf30447d9cbbbbbf387beafa.jpg)


